Monday, August 31, 2015

And the GreenCraft Winner is....

I am so pleased to announce the winner of the Autumn 2015 issue of GreenCraft is....


Autumn Grace!

Autumn, you can get in touch with me via my email link on the blog (though I have heard it is not working and I have not been able to figure out what is up...)

You may also reach me through a convo at either Etsy shop or through Google +.

Please be sure to send your address so I can forward it to Stampington and they will send that issue right to you.

Congrats!

Thanks for stopping by...

Sunday, August 30, 2015

Plaster dipped silk flowers...


Have you seen plaster dipped silk flowers?

I saw them last fall and was enchanted. 

 I wanted to try it for myself.

Sometimes, the crafting gods deliver what I need right to my doorstep (almost).

Last winter, a small silk flower arrangement blew into our yard on a windy day.

There were red, white and blue silk roses stuck in a piece of styrofoam.  

The flowers were all faded and my husband was going to throw it away.

I saved it just for this project.


I mixed plaster with some water to make a little thinnner than pancake batter consistency.

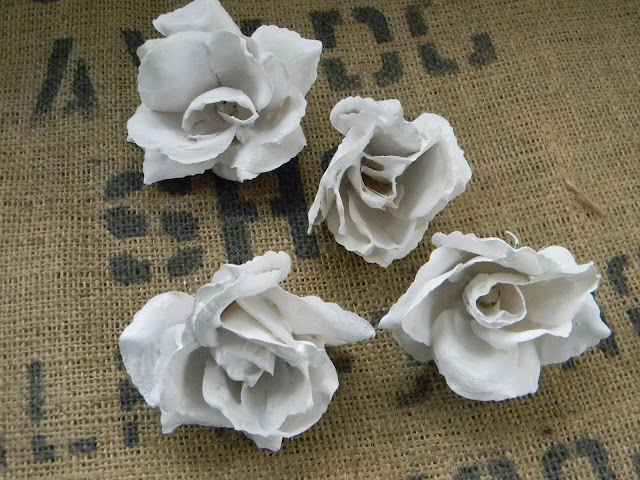
Then I dipped each rose into the mixture and pushed it down several times to coat all the petals.

I hung them on this card display.

The newspapers below are very important.


The red and blue roses required more than one dipping to cover the flower as much as I wanted it to.


These were the white roses and I only dipped them once.  I liked the finer, more delicate look only one coating created.


They have the look of porcelain.


The blue and red ones were dipped twice and have a chunkier look to them.

You can also see where they were touching the hook below on my rack as it left a mark when the flowers were removed.


I wanted to make a coastal arrangement to say good bye to summer.

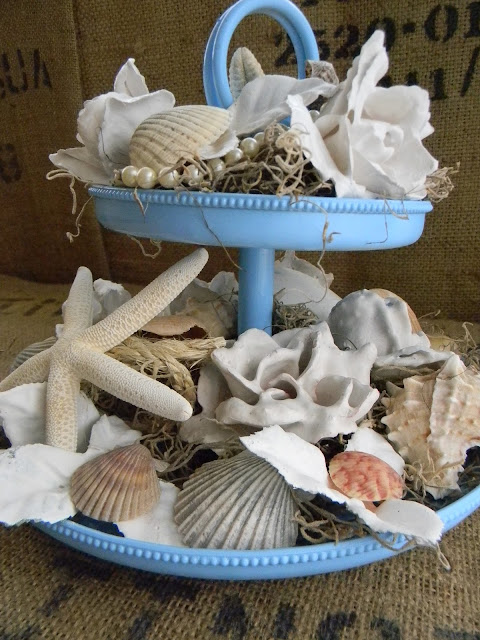
First I spray painted this hammered aluminum two-tiered stand.

Then I added my plaster flowers and some coastal touches.


I started with some spanish moss to fill the trays.


Then I added starfish, seashells and pearls.


I gathered another handful of smaller shells and went back to fill in some bare spots and cover  any chips in the plaster.


I also added some of the plaster-dipped leaves.


It is a fun coastal arrangement.


Right now it is on my front porch next to the door.


For these photos, it is on my workbench on the back porch.


I think something like this would be so fun to do for a coastal wedding.


Some sisal rope would be a great addition as well.


I really enjoyed this process.


It was fun and easy to do.


They are pretty fragile so it not something you want to do for things that will be banged around or handled a lot.


Once I am done with them in this arrangement, I may do a fall version with leaves and a Christmas version with either poinsettias or evergreen branches.


I removed my roses from the stems, but you could make an arrangement in a vase too.


The plaster hardens in the cup relatively quickly but it was hot and humid when I did mine, so they took a minimum of overnight to dry.


Thanks for stopping by....

                  Linking up with these great blogs.

Saturday, August 29, 2015

2 Tiered Nest Display from a Tomato Cage

I have some wild grapes that grow in my yard.

I decided to re-make a project I did about 15 years ago.

Inspiration came from a magazine from the time called Country Business.

It was for shop owners and had lots of wholesale companies, display ideas, and business advice.

They had a display piece made from a tomato cage and grapevines.

The first one used grapevines from my neighbors. 

 They ripped out all their grapes and I hauled the vines to my yard.

By the time I did the project, the vines were stiff and I had to soften them by soaking them in buckets of water.

This time I was smarter.


I picked them fresh and stripped the leaves right away to use them the same day.


Next I dug an old tomato cage out of the greenhouse.

It is a bit wonky.

I don't mind. 

 I can just bend it and straighten it out.


I spray painted the tomato cage black.


Next I practice being a bird.

Let me tell you, they are amazing.

It is not as easy as you think.

I turned the cage upside down  so the top circle now rests on the table as the base.


I wove the grapevine in the  next circle.

Because the vines are fresh, this was SOOOO much easier than 15 years ago.

I love the little curly tendrils.


I basically used the whole pile I showed you at first to do this one nest.


You can see how the top wires are curled over.

Bottom nest...done.


Now for the top nest.

It is the same process.  

Just weaving and winding and wrapping.

I love this now that it is done.

You can use it to hold anything...


I love it.

Thanks for stopping by....


Friday, August 28, 2015

Scarlet

One color I almost never use exclusively in designs is red.

I am not sure why.

I love red.

Red cars, red accents, red birds...

This necklace and bracelet set uses scarlet beads and wood beads with leather.

Oh, and a tiny bit of bling.


It is also a fun way to play with knotting and design.


The necklace is strung on waxed linen cord first.


The leather cord is added as a design element afterwards.


My handmade wire components are perfect for this design.


I like the wooden beads too.


I guess I just love natural components.


I made a little triple strand bracelet to go with it.


It is also strung on waxed linen thread first and then the leather cord elements are added.


One challenge I always face when making jewelry is to make it smaller.

I have large wrists, so to fit me it needs to be big.

For most everyone else, I have to make it too small for me.


This one is like that.

Too small for me.

Perfect for someone  else.


Thanks for stopping by....

                   Linking up with these great blogs.

Wednesday, August 26, 2015

Workbench Wednesday....Resin

Hey...

Check it out..

A clean workbench.

That won't last for long.

I am working on resin components.


I like to do resin when the weather is warm so it sets up faster and the garage doors can be open to let the fumes out.

I am using a variety of purchased molds.


I also used handmade silicone molds.

Some are made from silicone mold compound and some are made form 100% silicone in the tube from the hardware store..

There is a trick to using it for molds.

 I will share it with you some time.

I even used some plastic packaging I saved from some scrapbooking and jewelry components..


For right now, I am showing you the resin madness on my workbench.


I am very messy when I work with resin.

It gets all over it seems.

So I try to work on the trays so my counter is not covered with little resin puddles.


Those of you that have worked with resin may wonder about the color of my resin.

Here is my little secret.


While I do use clear resin from the craft store, I also use resin from automotive supplies.

I buy it by the quart.

It is reasonably priced.

It is amber instead of clear.


If I am painting the pieces, the color does not matter anyway.

And sometimes I LIKE the amber.


When I went to use resin this time, I noticed 2 of my partial quarts had hardened and were useless.

Sigh.

So I decided to use this whole quart this week.

I did multiple moldings of many of these molds.


See anything intriguing?

I always love this kind of photo on someone's blog.

It is like an artist's version of Where's Waldo...

My eyes dart all around taking in the shapes and possibilities.


One trick I learned is for when your resin pieces are a bit sticky when you unmold them...

I put them on a tray and pop them in my craft dedicated toaster oven on the lowest heat for 15 minutes.

If they are still sticky after they cool, I do it again.


Usually that fixes them right up.

Here is one of the molds made from the silicone from the hardware store.

Not pretty, but effective.

I like this silicone for making bigger molds since the 2 part silicone mold making compound is expensive.


It seems to work almost as well as the purchased mold compound.


Any spillover can be easily broken or snipped off once they cure.


These animal heads are my favorites this time.

Inspired by Sandy Martin in the Winter 2015 issue of Belle Armoire Jewelry magazine, I have been dying to do this.

I am loving these and cannot wait to add paint and work them into some fun designs.


What is on your workbench right now?

Thanks for stopping by....

                 Linking up with these great blogs.